BLOGGER TEMPLATES AND TWITTER BACKGROUNDS »

Monday, December 12, 2016

Mixed Numbers and Improper Fractions

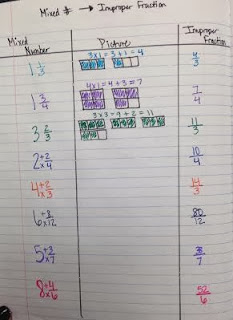
We introduced fractions greater than one by modeling them with pattern blocks and writing them as a mixed number, and also as an improper fraction. Then we discussed the similarity between the two numbers.

After lots of examples with pattern blocks, we moved to pictures in our journals. We started with the mixed number, drew the picture, then named it as an improper fraction. After several of those, we started with the improper fraction, drew the picture, then named it as a mixed number.


The next day, we talked about how we went between the two types of fractions using pictures to help us. After examining our pictures, we noticed some shortcuts to help us be more efficient when changing from one type of fraction to the other. Eventually, the kids discovered the multiplication and division connection to help speed them along.


Our Classroom Poster

Friday, December 9, 2016

Strip Diagrams to Model Computation

Most students at this point can read a word problem, figure out the operation(s) needed, and solve the problem(s). What might be a little more difficult for them is modeling their operation(s) with a strip diagram. This week we worked through all four operations, and discussed what the strip diagrams for each operation could look like. If a student truly understands what is happening with each operation, he/she should be able to model it.
Division and Subtraction Strip Diagrams

Multiplication and Addition Strip Diagrams

Friday, October 28, 2016

Fraction Review and Intro to Improper Fractions

This week we took a brief look at fractions. We started by reviewing what we already know about fractions such as definitions and pictures.

After we reviewed, we looked at pieces of fractions and discussed what happens when the numerator and denominator are the same number. We looked at pictures of pizzas cut in half. Once I have two halves, I have one whole. Finally, we explored what happens when we have more than one whole. We discussed how we would name these improper fractions (we'll learn about mixed numbers a little later this year.) We named them on a number line, as well as in picture form.

Monday, October 24, 2016

Moving to the Standard Multiplication Algorithm

The progression from matrix box to standard algorithm
This week we moved to the standard American algorithm for multiplication. Parents are always thrilled when we get to this, as this is the way they learned! We began by looking at our area model (in blue), and discuss what places were being multiplied during the process. The tens places of both numbers are multiplied together, then the tens of the first number is multiplied by the ones of the second number. Next the ones of the first number is multiplied by the tens of the second number. Finally, the ones of the first number is multiplied by the ones of the second number. Sounds confusing, right?! So we begin to discuss what this would look like vertically (in red). Then we discuss the traditional algorithm (in green), and make connections between all three strategies. This really helps your children understand the place value involved in the algorithm! Woohoo!

Wednesday, October 19, 2016

Multiplication Area Model

We finally got to begin 2-digit by 2-digit multiplication this week! I began by reviewing with them the area model we used when multiplying by 1 digit. Then the kids self-discovered (with my prompting and questioning) that they could create an area model for 2x2 multiplication. They referred to it as the "double-decker couch." Ha! The kids are absolutely loving the 2x2 area model!! They love it because it's super easy. I love is because it shows them the place value involved in 2x2 multiplication. They can actually see the process of multiplying the ones and tens of one number by the ones and tens of the second number. When they finally move to vertical multiplication, they'll actually understand why it works! There's nothing better than actually understanding WHY you do something!!!

The area model can actually be formatted to fit more than 2x2 multiplication. We played around with differently-sized numbers and made our matrix box fit those problems as well.

Our class anchor chart
Close-up of the box itself

An example

Friday, October 14, 2016

Breaking Apart Multiplication

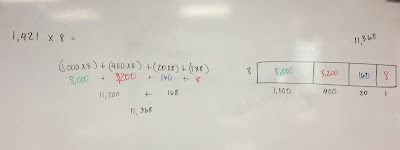
As we move to multiplying larger numbers, I like to guide them into the algorithm. We start by investigating the pattern when multiplying by multiples of 10. We look at the problems 2 x 3 = 6, 2 x 30 =60, and 2 x 300 = 600. We discuss what is the same/different about each problem, then we look at several other similar examples. Eventually the kids see the pattern of just "adding a zero" each time. Patterns are a great shortcut, but it's important the kids understand why they work.
Next we move to breaking apart larger multiplication problems, such as 18 x 5. We can break the 18 into 10 and 8 to help us multiply easier.

We practice this with many numbers, also looking at the array model for each. We slowly get to larger numbers like this one...
This will lead us into the multiplication algorithm next week.

Monday, October 10, 2016

Finding the Factors of 12

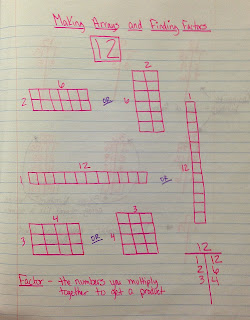
We begin our lesson on finding the factors of a number by making all the arrays we can think of for the number 12. The kids usually do a really good job finding them all. When I question if we've found them all, however, the kids start to second-guess themselves. This moves us into the discussion of what we're actually finding when we're making these arrays. I lead them to discover they're finding the factors (number that are multiplied to make a number) of 12.

But how can we keep our factors organized so we can make sure we've found all the factors? This leads us to making our T-Chart. We always start with 1 and the number itself. Then we move to the next number in the number line, 2. We know 2 is a factor because 12 is even, so we then find the partner for 2 which is 6. Then we move to 3, which has a partner of 4. The next number in the number line is 4, which we've already used, so we know we're done. Once numbers start to repeat, we've found all our factors. This lesson is followed by lots of practice finding the factors of many different numbers. As we're making our factor lists, we discuss the definition of prime, composite, and square numbers. 

Thursday, October 6, 2016

Elapsed Time

Elapsed time can be a challenge for kiddos because they like to try to find the difference between two times by lining them up vertically and subtracting for the difference. In a whole-group discussion, we talk about why this won't always work. Our number system is base-10, which means when we reach 10 in a place, we must move it over to the place to the left. For example, when we get 10 ones, we turn it into 1 ten. We also borrow in groups of ten. Time does not follow these rules, so we cannot always successfully borrow or carry vertically.


Monday, September 26, 2016

Introduction to Vertical Addition and Subtraction

When I introduce vertical addition and subtraction (done on different days because it's too much for one day!) I do it very concretely. We actually make the problem with base ten blocks and break apart our problem by place value. When we borrow a ten for the ones place, we actually take a rod out and replace it with ten units. Or when we carry a ten from the ones, we take ten units and turn them into a rod. It doesn't take long for the kids to understand why we're doing what we're doing. Soon we move to a written version with the place value broken apart. Finally, some students will move to the standard algorithm. They only make this move when they're successful with the broken-apart method. We continue practice with the vertical method until we've reached mastery. It's important to have these concepts mastered before we begin multiplication and addition! 


Friday, September 23, 2016

Tables and Measurement Conversions

This week we spent lots of time looking at sets of data in a table, and finding the relationship. It's often easy for students to find the pattern and fill in missing information. What can be difficult is trying to use number sentences to describe the pattern. Often our kids are shown a table, then given words that describe it to determine which descriptions are correct and which aren't. We spend time practicing actually plugging in the data to check the description.
This week your child was given a picture of a vehicle. They had to determine how many wheels the vehicle had, then create a table to prove how many of their vehicles were needed to reach 24 wheels. After we finished, we describe the table in many ways, then determined which of our descriptions were correct and which weren't.

Next we discussed how tables could help us with measurement conversions. The students figured out they are a great tool in keeping our conversion work organized!

Monday, September 19, 2016

Rounding

Rounding numbers is often taught in a very rule-based way, not conceptually.
"Just look at the next door neighbor and if it's 5 or higher, the number goes up. If it's 4 or less, the number goes down."
That probably sound really familiar to most adults. There are even a ton of cute sayings to help us remember this idea.
I like to focus on a couple of things when teaching rounding. Firstly, I ditch the phrase, "goes down" and replace it with "stays the same." The number in the position you're rounding never goes down. It either goes up or stays the same. This can be confusing for some. Secondly, and most importantly, we start rounding by placing numbers on a number line. This helps us determine if the number rounds up, or stays the same.
For example, if we're rounding 437,284 to the nearest hundred, we would make a number line. One end of the number line will be labeled with the hundred thousand the number is already in - 400,000. The high end of the number line will be labeled with the next hundred thousand - 500,000. Next we find the middle of the number line - 450,000. Finally we determine if the number falls to the left of 450,000 or to the right of 450,000. We do this by focusing on the ten thousands place (this is where the whole "look next door" idea originates.)


After we practiced this MANY times, rounding to MANY different places, we moved to the shortcut.

Thursday, September 15, 2016

Relationship of Numbers in our Place Value System

One of the most important concepts a child can learn is number sense. This week we spent a lot of time investigating what happens as we move left or right in our number system, and comparing numbers in different places in our place value system. We related them to each other by describing their relationship. Using equations to describe the relationship is a pretty big concept for 4th graders to grasp. We spent lots of time writing equations to describe them. I tried to color code my journal examples so it makes sense.


Friday, September 9, 2016

Place Value, Expanded Form, and Number Line

This week has been all about place value. We started our discussion with the importance between the words "place" and "value". We practiced writing numbers in word and expanded form, and spent lots of time practicing saying numbers correctly. In 4th grade, the expanded form changes a bit so that we focus more on the multiplication involved. For example, 28,437 would look like (2 x 10,000) + (8 x 1,000) + (4 x 100) + (3 x 10) + (7 x 1). Today, we focused on putting these numbers on a number line and correctly identifying the intervals of the number lines.


Friday, September 2, 2016

Frequency Tables, Dot Plots, and Stem and Leaf Plots

This week we focused on ways to collect and organize data. We began by making frequency charts and dot plots, which aren't new for 4th graders. We simply reviewed their set-up and purpose. We then moved to stem and leaf plots. These are new for 4th graders, so we spent a whole math block just creating them with made-up data. The next day we brought in some already-made stem and leaf plots so that we could really evaluate them to determine what they represented.


Thursday, August 25, 2016

Classroom Culture

One of the most important things that happens at the beginning of each year is the setting of expectations. I like to put my students in charge of how our classroom is run (with some limits, of course!), and want their input on what will make this a successful year.

We began with a Classroom Culture Gallery Walk. The students answered answering six prompts - What do I hope to learn this year? What can Mrs. May do to help me be successful? What do I have to do in order to be successful? School should always be ________. School is important because _________. What should students in our classroom be doing to make our classroom run as smoothly as possible?

After every student had answered the prompts, we did a gallery walk around to look at the different responses. These responses led to the creation of our Classroom Culture Code. I got this idea from a teacher blog several years ago, but cannot remember whose in order to credit it. If you know, please let me know!


Later this week we worked on center expectations. Each student wrote five ideas regarding effective center time. After they wrote their ideas, they got into groups and tried to categorize and title their ideas. When they were finished, we combined them into our Center Time Rules. This idea came from my summer professional development with Anne Davies and Sandra Herbst.

Monday, August 22, 2016

Happy New Year!!!

Here's to new beginnings! One of the biggest perks of being a teacher is that every year is a fresh start! Everything is shiny and new, and it's a great time to reinvent ourselves and remember why it is we do what we do. My personal goal is to get better and better. I never want to stop growing, both as a teacher and as a person. So my "New Year's Resolution" every year is simple - be better than you were last year.

Four years ago I created this blog, as my resolution was to become an even better communicator. I keep this blog and send the link, along with class information, every Friday in my weekly e-mail to parents. A great deal of what we do is in our journals, so this blog has been a great way for parents to see what we're doing in class. I'll post picture examples of our activities every week. So please enjoy the picture evidence of the amazing thinking going on in the 4th grade!! Happy New Year!!!


Monday, May 16, 2016

Forms of Energy

As we discussed different forms of energy, (we focused on Mechanical, Sound, Electrical, Light/Solar, and Heat/Thermal) we decided to make a foldable to hold all of our information. Inside we put the definition of the form of energy, and on the outside we added a picture example as well. Here is an example of our foldable - one picture is the outside view and the other picture is inside the flaps.

Thursday, May 5, 2016

Fighting a Dragon with a Cannonball!


About to release marble from 4 cm
Yesterday we fought dragons with cannonballs! The children built ramps using a ruler and a Styrofoam cup. They placed a paper dragon in front of the ruler, and started their "cannonball" at differing spots on the ruler to see the results. They placed the cannonball at 4cm,8cm, 12cm, 16cm, 20cm, 24cm, and 28cm. The distance the dragon was pushed was documented, averaged, then graphed.

After the marble was released from 4cm


About to release marble from 12cm

Table of our results
Graph of our results